Installation Guide for Sliding Doors

The installation process for sliding interior doors presents an effective way to create more space within a room. This installation is conducted following the leveling of wall surfaces and the placement of finishing floors. If floor coverings are absent, it is imperative to calculate their thickness and incorporate this measurement into your assessments. Furthermore, before embarking on the installation of sliding doors, it is essential to verify the vertical alignment of the doorway and ascertain the desired direction for the door leaf to retract, thus freeing up the necessary space on the corresponding side. When planning the installation of two sliding doors, you must allocate adequate space for both doors to retract on opposite sides of the opening. Once the preparatory measures are completed, you can proceed with the installation of sliding interior doors, a process divided into multiple stages.


- Affixing the Timber Commence by marking and securing the timber. Press the door leaf firmly against the doorway, considering the width of the guide and accounting for an additional 5 mm of clearance. Indicate the future boundary of the beam’s placement at the appropriate level. Depending on whether the door will open to the right or left, position the beam so that its center aligns with the right or left side of the frame, respectively, and mark the position. Create a horizontal line connecting these marked points using a level. Proceed to directly install the beam by drilling holes and firmly anchoring it to the wall with anchors.
- Installation of the Sliding Door Guide Several methods are available for mounting the compartment door guide, with the most common approach being attachment to the upper beam. Securely screw the rail onto the underside of the beam using screws. Alternatively, you can pre-mount the rail before installing the timber. Insert rollers into the fixed rail and test their sliding quality by manually moving them along the groove.
- Installing the Lower Guide The lower guide of the interior door can be installed using three methods:
- Cut a groove in the floor covering and install a roller rail within it.
- Securely attach the guide directly onto the floor covering and conceal it with a threshold.
- Mount the rail on the end of the lower door panel, having prepared a floor groove in advance. This option is suitable when the lower rollers are substituted by a guide knife that holds the blade.
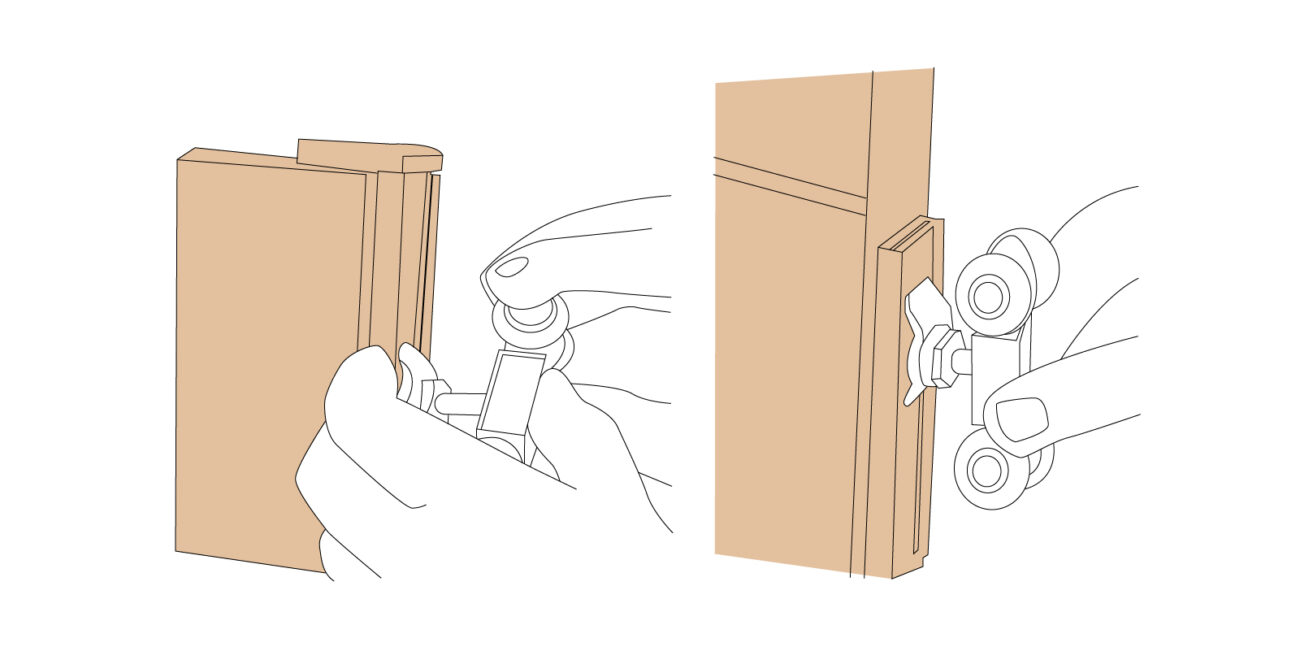
- Assembling the Sliding Door Directly assembling the sliding door involves several steps:a. Installing Rollers Position the rollers either inset from the door’s edge by about 16 times its width or directly from the edge itself. The appropriate option depends on the door model and is detailed in the manufacturer’s instructions. Mark the roller installation points with a pencil and proceed to drill holes for hardware attachment.b. Mounting Plates Mounting plates are essential if the rollers are attached to the edge of the door. These plates facilitate the required inset. Fasten the plates with self-tapping screws, at least 7 cm in length. The plates include threaded supports and side covers, upon which the roller platform is mounted.c. Guide Knife Installation (if applicable) If the lower part of the sliding interior door features a guide knife, create a groove at the end of the door leaf, about 1 cm from the edge. The groove’s depth should exceed the knife’s thickness by around 2 cm, typically ranging between 1-2 cm. Roll the door along the rail multiple times to ensure smooth movement.d. Fittings Installation The final stage involves installing the door’s fittings. Remove the canvas with rollers from the guides and place a rubber shock absorber in the runners to serve as a door stop. Mark the locations on the canvas for handle and lock fitting installation. Carve grooves using a chisel or occasionally a drill, then install the lock and handles. Rehang the door on the guide, effectively concluding the process of installing sliding interior doors.
Completing the Installation The process culminates in the installation of extensions and platbands, elements that conceal the mechanisms and finalize the design of the structure. While comprehensive instructions enable the installation of an interior sliding door independently, experts recommend pursuing this course only if the installer possesses the requisite experience. Seamless operation of sliding doors over the years can be ensured solely through meticulous installation expertise.


 Steel Security Doors